DRAFT Scraping FBref with Python: A Beginner's Guide
Scrape football data from FBref using Python and the ScraperFC package with no coding knowledge prerequisites whatsoever.
Scraping FBref with Python
FBref is a free football statistics site run by Sports Reference LLC, offering detailed player and team data — including some unique stats like penalties won, not available elsewhere. In addition, I have found FBref to be significantly more accurate and comprehensive than competitors such as Transfermarkt, particularly on penalty data.
This project shows you an easy-peasy and adaptable way to scrape football data from FBref using Python and the ScraperFC package. It is particulary suitable for beginner programmers.
Scraping is a method of extracting data from websites. You write a programming script that requests HTML content from a website. It’s just like you were browsing the site, except your program can race through countless pages and copy the data. The program then parses (filters and converts) this data so you just get the information you want delivered as a file to a location you want. It is infinitely more efficient than manual data collection and is the best option when APIs or downloadable files are not provided by the site.
By the end, you’ll be able to:
- set up a JupyterLab environment using Anaconda Navigator
- extract customised football data for players and teams from FBref
- clean and merge datasets for easier analysis across leagues and seasons
We will go from this: to this:
Prerequisites
Internet connection
3-4 GB of disk space
Ability to install programs (admin rights if needed)
Always check a website’s robots.txt and terms of service before scraping *
No coding skills required.
I am not a programmer. I need this data for personal projects that are helping me learn coding skills. Therefore, scraping this data was more challenging for me than most people and I made very avoidable errors. Often, documentation assumes a basic level of familiarity with environments and terminology which I do not possess. Therefore, I will explain all steps without assuming any knowledge whatsoever.
All tools will be installed during the guide
We will set up the environment in Step 1: Setting Up Your Environment.
*See FBref’s robots.txt and terms of service. FBref allows scraping, but it is important to be respectful and avoid overloading their servers. This will be discussed in the Step 2: Scraping FBref section.
Why FBref?
FBref and Stathead both host Penalty Kicks Won data and are run by the same company. Which should I choose? When I began this project, I did not understand that Stathead and FBref were 2 different things. Both are run by Sports Reference LLC, and both host the same array of Opta data for football (soccer). But there are several crucial differences and we are left with only one option:
| Stathead | FBref |
|---|---|
| Sophisticated stat-search function | No search function - just lots of stats everywhere |
| Excellent for exploration | Awkward for exploration |
| Paid (approx $8/month as of April 27, 2025) | Free |
| No ads | Ads |
| Data can be gathered by ‘copy and paste’ or by download (Excel & CSV) | Data can be gathered by ‘copy and paste’ |
| Data is paginated and max. 200 records can be downloaded at once | Data is not paginated |
| Data CANNOT be scraped - not possible and against terms of service | Data CAN be scraped |
Scope Of Instruction
My project focuses on scraping the Big 5 European leagues — Premier League, La Liga, Bundesliga, Serie A, and Ligue 1 — across the 2016/17 to 2023/24 seasons. I adapted the ScraperFC package to get the data I want: its ‘standard’ and ‘miscellaneous’ FBref tables. However, this guide makes it very possible for you to extract as much or as little data as you want from FBref.
Instructions are also included for cleaning the scraped datasets and merging them. I am using my own project as an example, but advice on adapting my code will be provided.
Step 1: Setting Up Your Jupyter Environment
In this section, you will set up a JupyterLab environment using Anaconda Navigator, allowing you to write, run, and organize Python scripts within Jupyter Notebooks and scrape FBref data.
To use Jupyter Notebooks, you can use JupyterLab or VS Code. I prefer VS Code for general coding and I like the CoPilot integration. However, for data projects, I much prefer JupyterLab, which is accessed via the Anaconda Navigator. You can use VS Code and install Jupyter extensions. These combine to emulate JupyterLab. But I will not cover VS Code in this guide. Directory organisation, overall layout and previews are very intuitive within JupyterLab. Most importantly, VS Code is often very fussy about my Python packages and versions, etc. But JupyterLab just works.
Go here: https://www.anaconda.com/download and enter your email address.
Select your Operating System and install Anaconda. It is free.
Choose all the default settings during installation. Anaconda installs Python and many core Python packages such as NumPy and pandas, which we need for this project.
Tip: Advanced users may prefer installing Miniconda instead of Anaconda. Miniconda is a lightweight version that only includes Python and the conda package manager. It saves disk space and gives you more control over which packages you install. However, it requires manually installing everything you need (including JupyterLab, pandas, and other libraries).
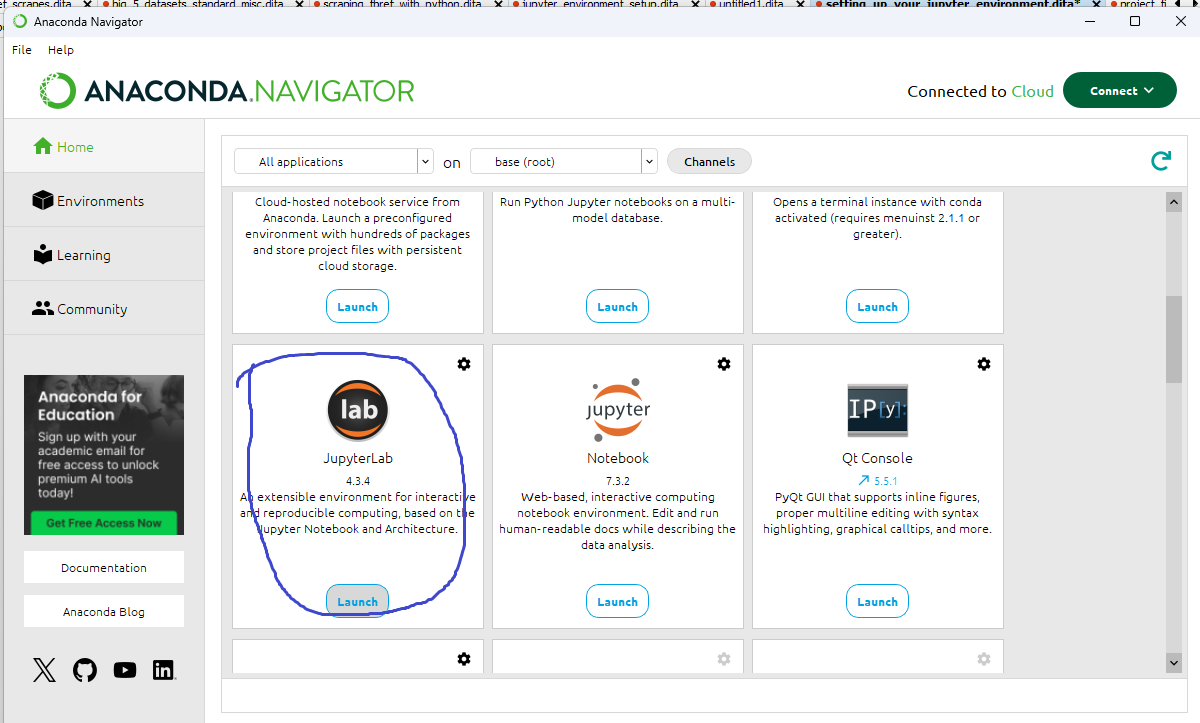
Open Anaconda Navigator from your start menu or desktop.
Launch JupyterLab from Anaconda Navigator
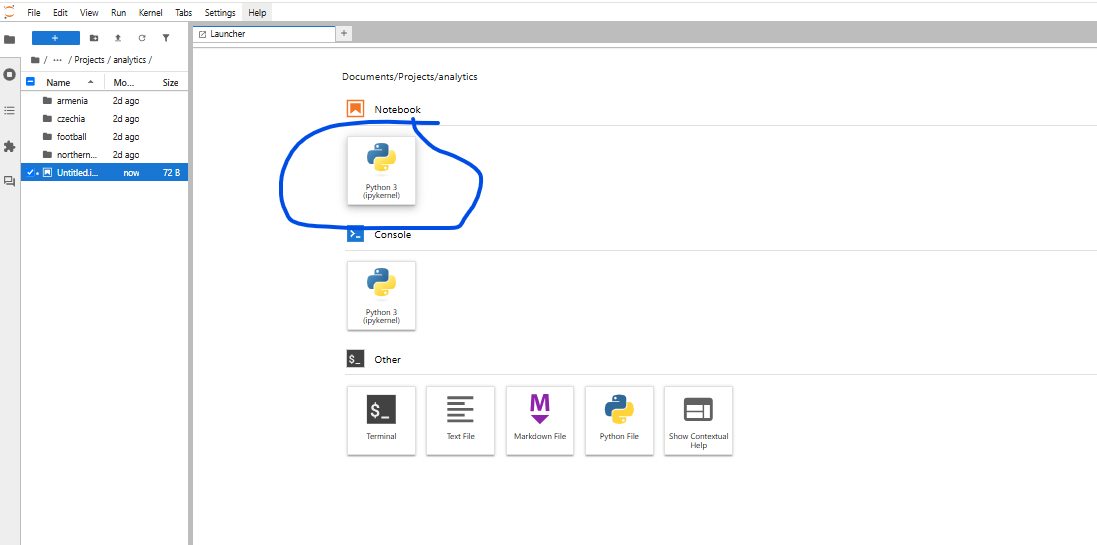
JupyterLab will open in your browser. This may be unexpected but it is normal.
Open a ‘New Notebook’
Select kernel in the top-right. Verify that it is using Python3. If not, select Python3. Select the checkbox to save this preference.
You now have Python installed as well as many essential packages and a graphical user interface (GUI) where you can write scripts, explore data, manage your file structure and install additional packages.


